Pre-requisites
- Copy
terraform-manifests from 10-ALB-Path-Based-Routing
- You need a Registered Domain in AWS Route53 to implement this usecase
- Copy your
terraform-key.pem file to terraform-manifests/private-key folder
Step-01: Introduction
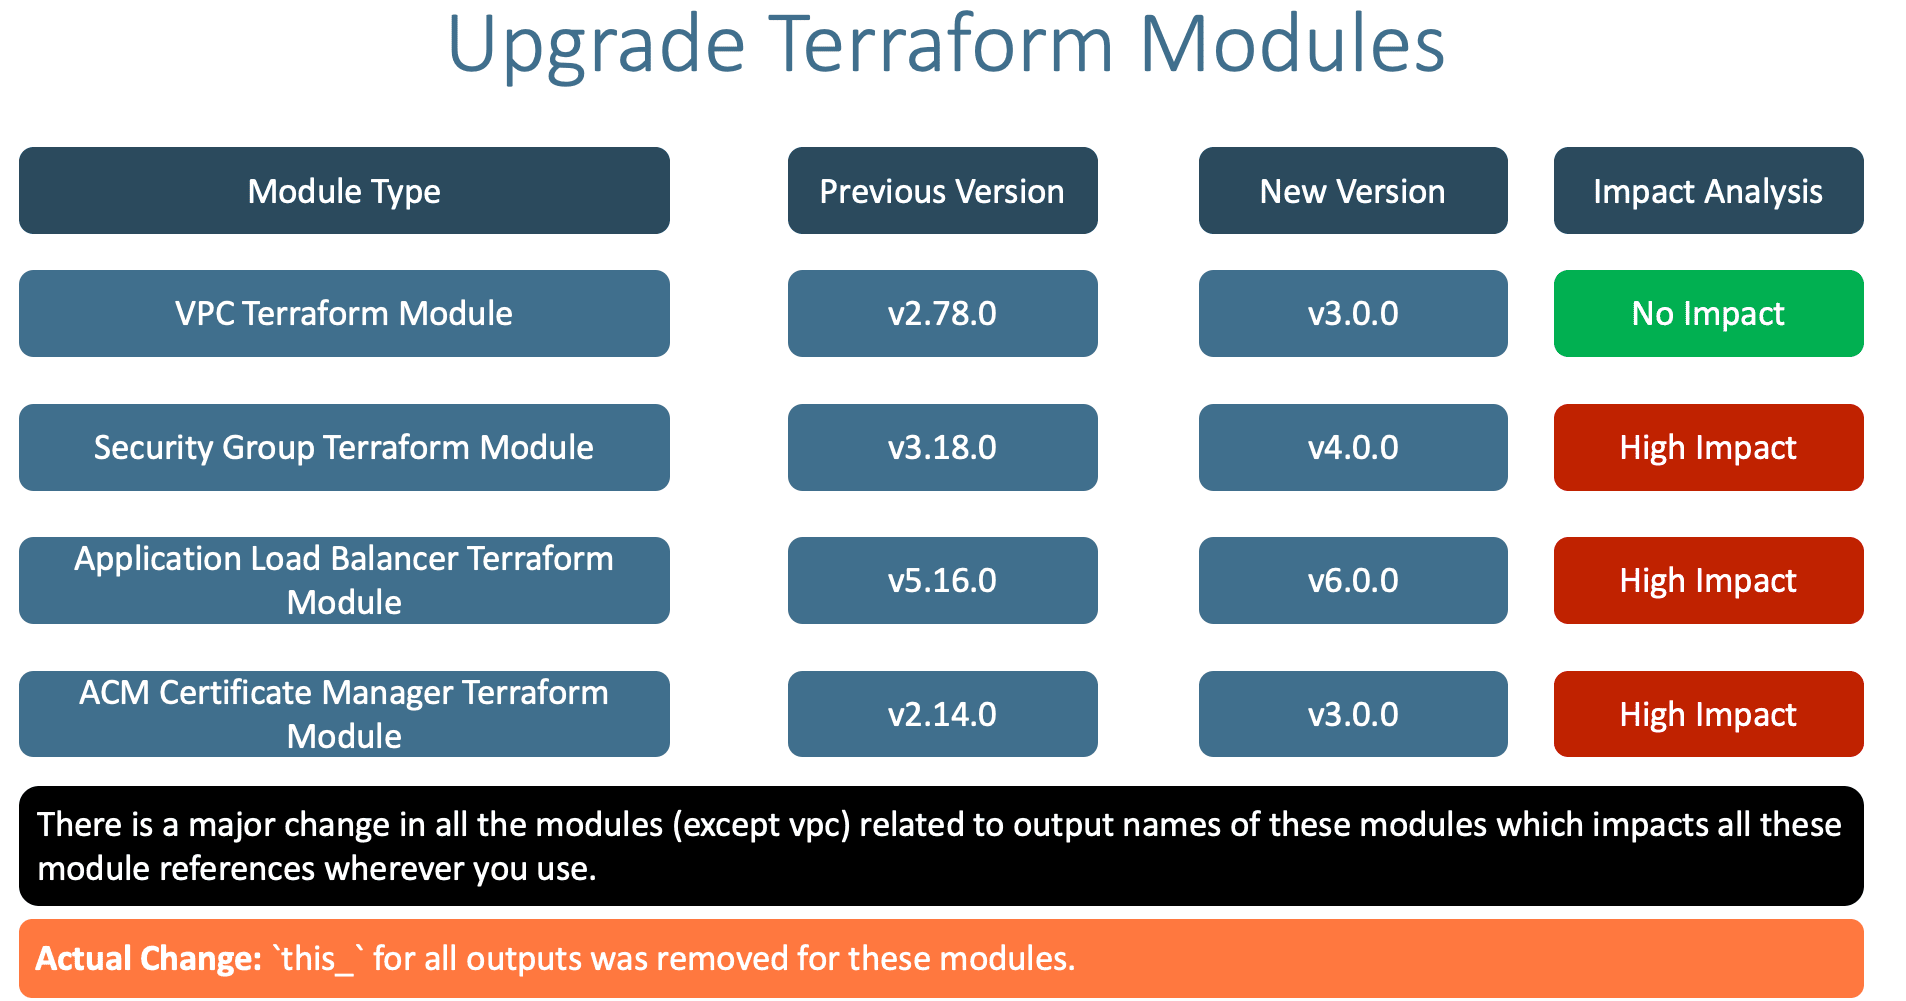
- There is a minor update to the following Terraform modules with
major-release tag today.
- We need to update them and also understand impact and fix the impacted areas
- VPC
- Security Group
- ALB
- ACM
- We are going to learn about how to understand the changes and fix them during Terraform Module Updates.
- We will learn that having fixed version for modules is a recommended approach instead of using version constraints like
>=, >, ~> etc
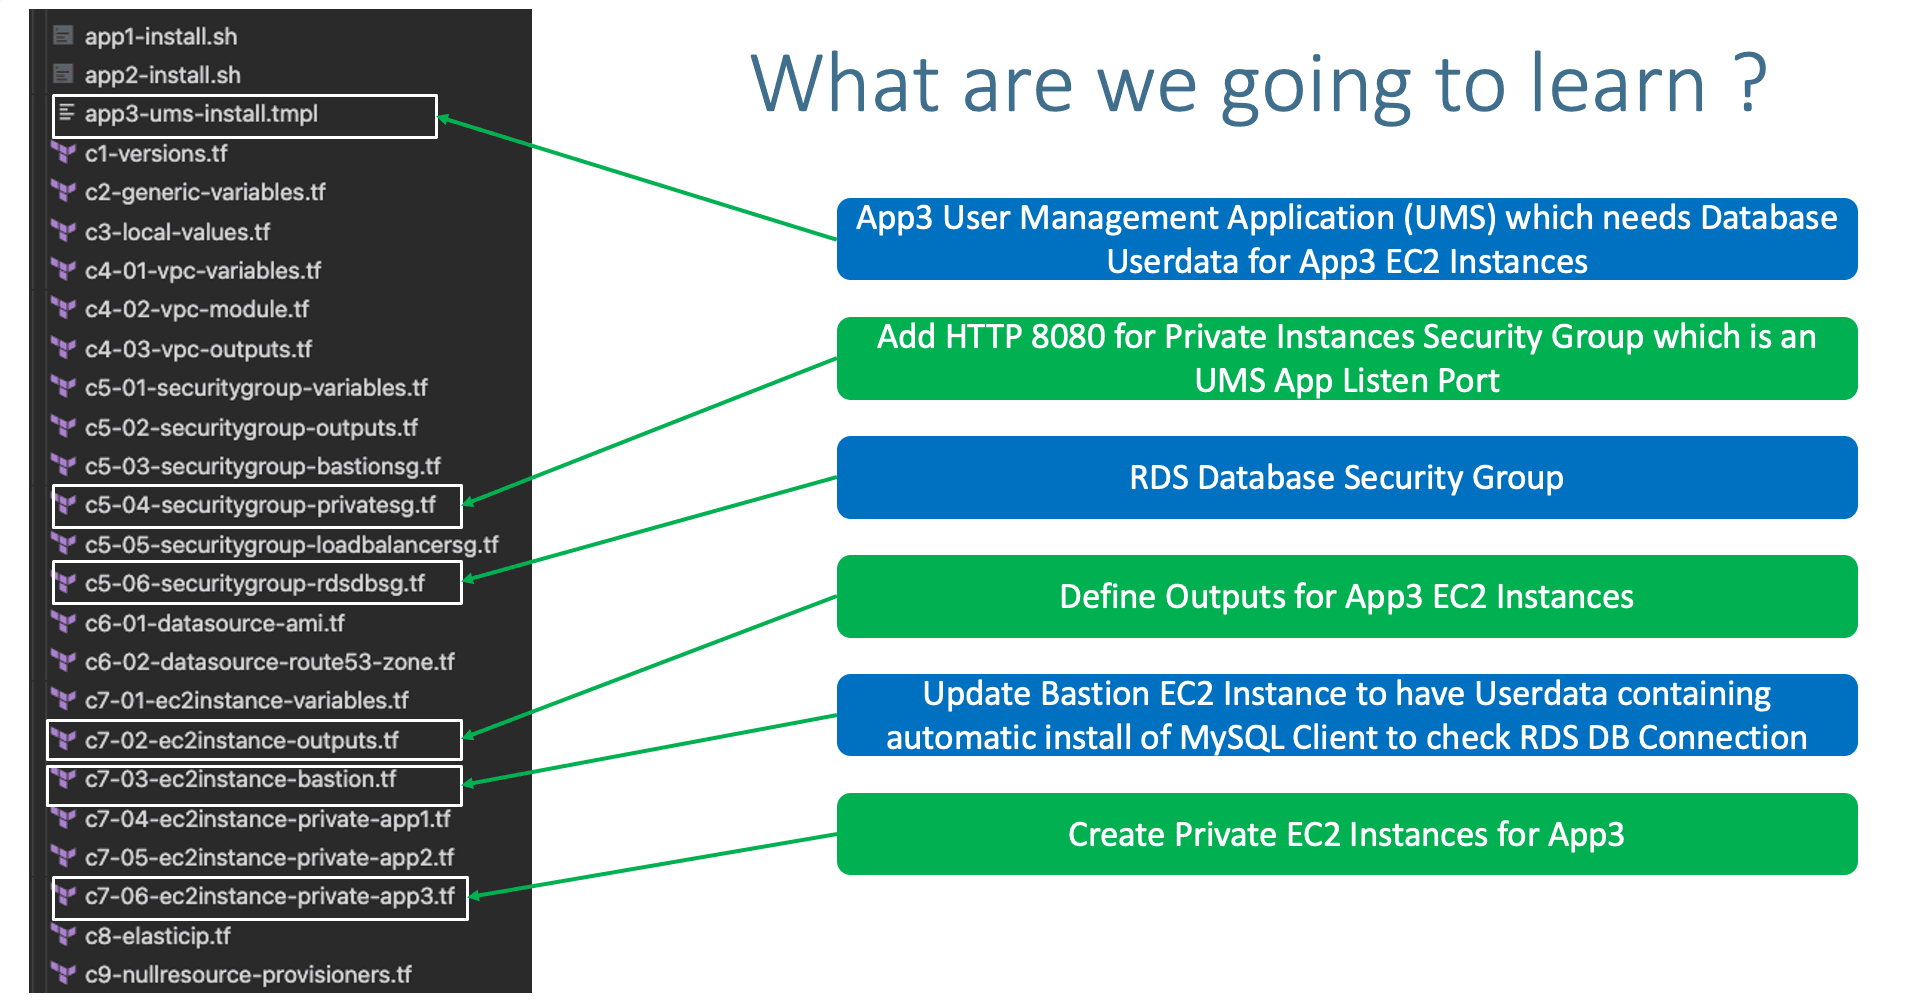
- Create RDS DB Security Group
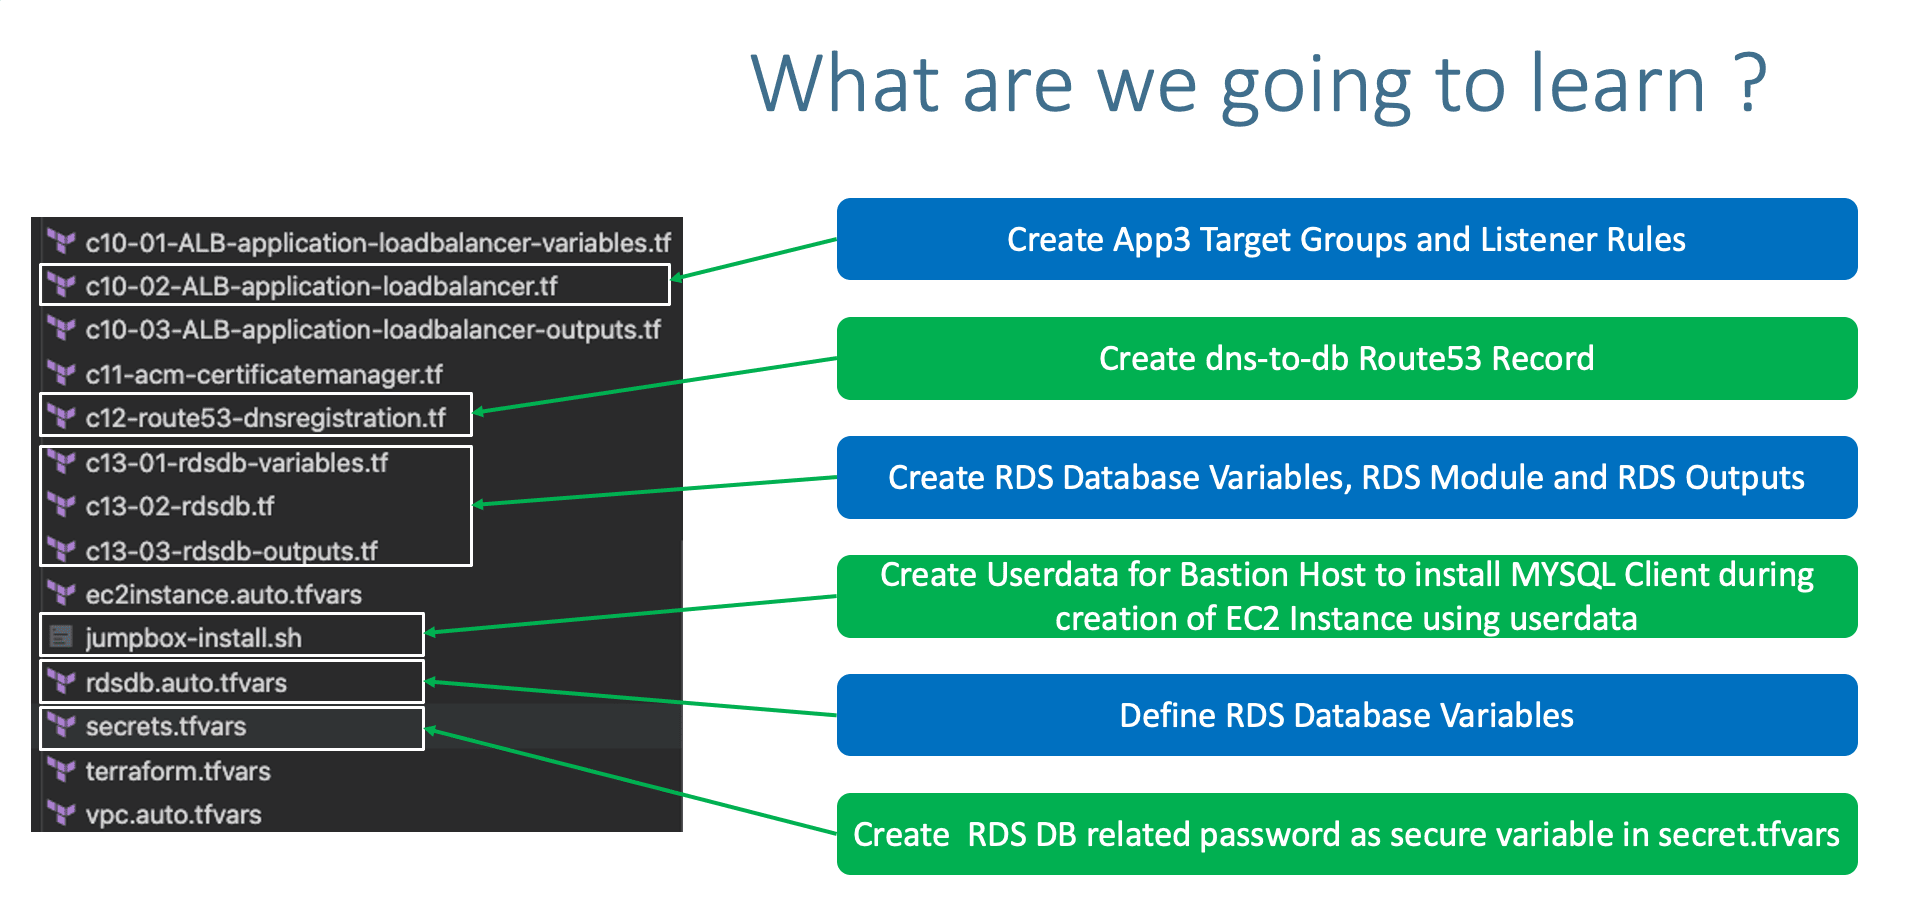
- Create RDS DB Variables with
sensitive argument for DB password
- Create RDS DB Module
- Create RDS DB Outputs
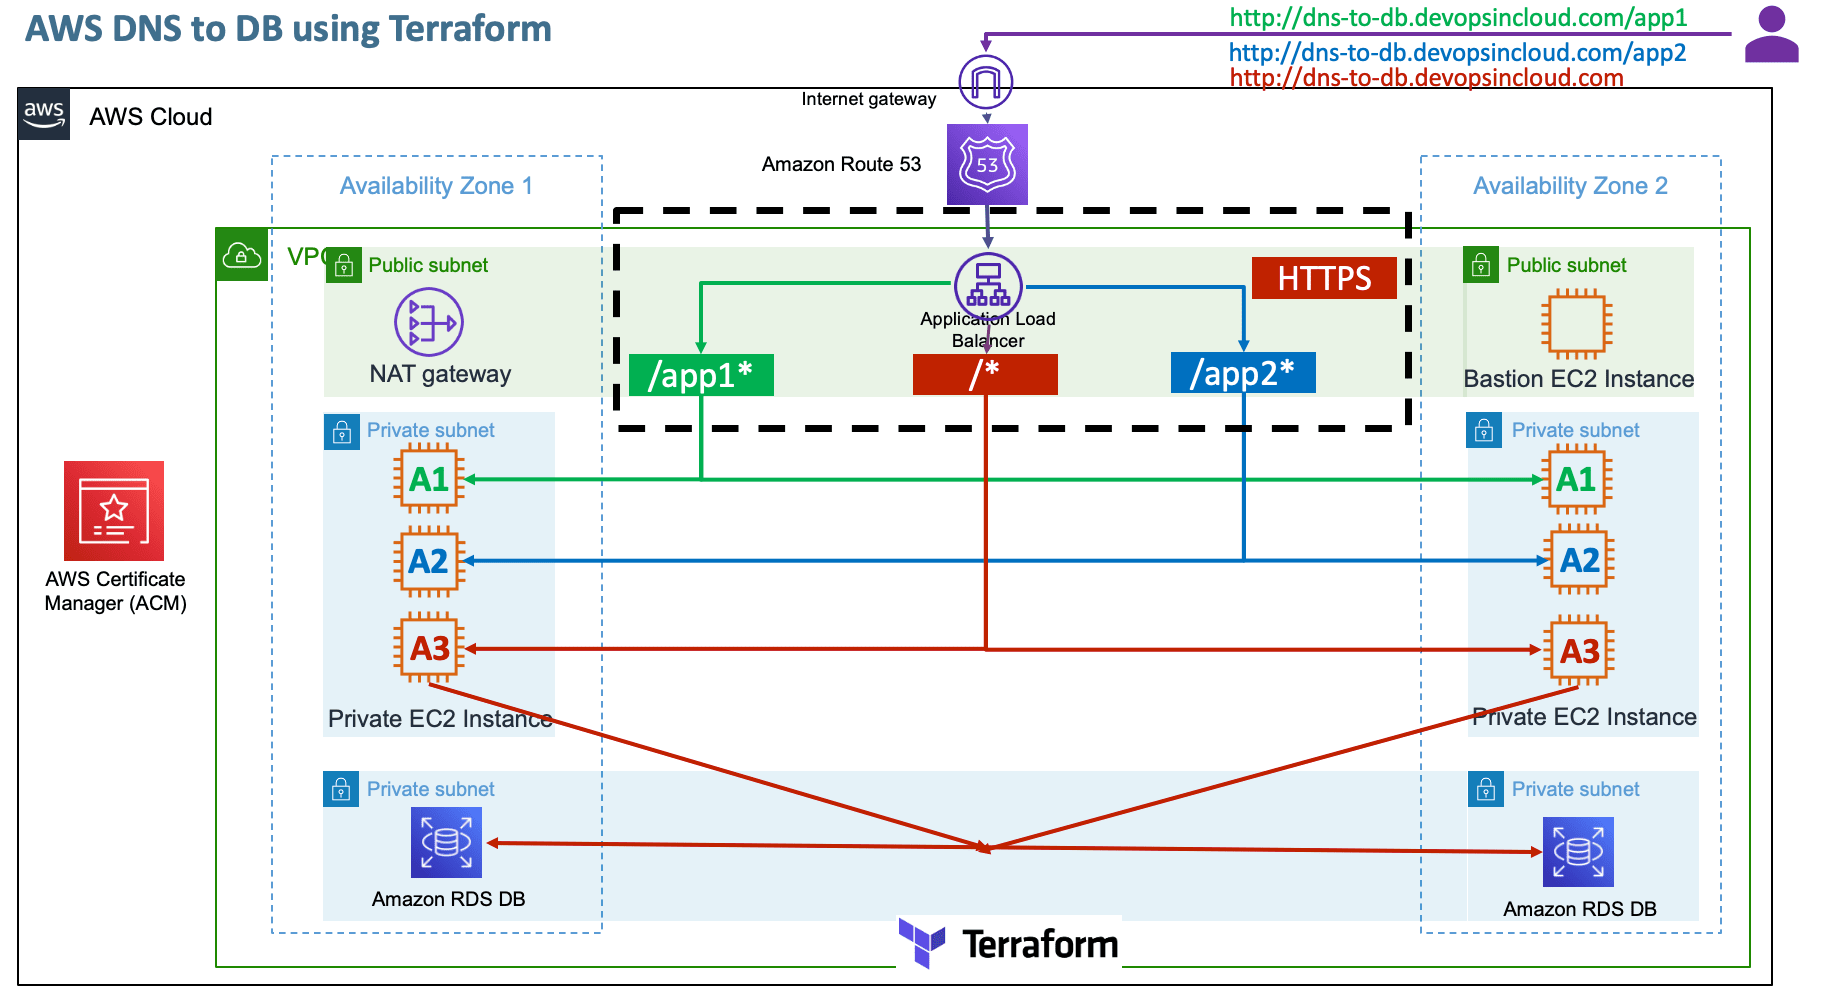
- Create EC2 Instance Module for new App3
- Create
tmpl file for userdata (Use Terraform templatefle function)
- Create Outputs for EC2 Instance
- App Port 8080 inbound rule added to Private_SG module
"http-8080-tcp"
- Create ALB TG for App3 UMS with Port 8080
- Enable Stickiness for App3 UMS TG
- Create HTTPS Listener Rule for (/*)
- Listener Rule Priorities
priority = 1
- app1 -
priority = 1
- app2 -
priority = 2
- Root Context "/*" -
priority = 3
Step-01-04: Create Jumpbox server to have mysql client installed
- Using jumpbox userdata, mysql client should be auto-installed.
- Connect to Jumpbox to test if default db and tables created.
- Connect via Jumpbox to DB to verify webappdb, Tables and Content inside
Step-01-05: Create DNS Name AWS Route53 Record Set
- Give
dns-to-db DNS name for Route53 record


Step-02-01: VPC Module
- Previous Version: 2.78.0
- Latest Version: 3.0.0
- Impact: No impact
Step-02-02: Security Group Module
- Previous Version: 3.18.0
- Latest Version: 4.0.0
- Impact: High Impact, need to update wherever that security group is referenced
this_ should be removed. Example all ec2 instances and load balancers
# Before
module.loadbalancer_sg.this_security_group_id
# After
module.loadbalancer_sg.security_group_id
Step-02-03: Application Load Balancer
- Previous Version: 5.16.0
- Latest Version: 6.0.0
- Impact: High Impact, need to update wherever ALB is referenced with
this_ should be removed. We need to update the aws_route53_record which already taken care in previous section
# Before
    name                   = module.alb.this_lb_dns_name
    zone_id                = module.alb.this_lb_zone_id

# After
    name                   = module.alb.lb_dns_name
    zone_id                = module.alb.lb_zone_id
Step-02-04: ACM Certificate Manager
- Previous Version: 2.14.0
- Latest Version: 3.0.0
- Impact: High Impact need to update the reference in ALB Load Balancer HTTPS Listener by removing the
this_
# Before
module.acm.this_acm_certificate_arn

# After
module.acm.acm_certificate_arn
- Create RDS DB Security Group
- Create RDS DB Variables with
sensitive argument for DB password
- Create RDS DB Module
- Create RDS DB Outputs
Step-03-01: c5-06-securitygroup-rdsdbsg.tf
- Create AWS RDS Database Security Group which will allow access to DB from any subnet inside a VPC.
# Security Group for AWS RDS DB
module "rdsdb_sg" {
  source  = "terraform-aws-modules/security-group/aws"
  #version = "3.18.0"
  version = "4.0.0"

  name        = "rdsdb-sg"
  description = "Access to MySQL DB for entire VPC CIDR Block"
  vpc_id      = module.vpc.vpc_id

  # ingress
  ingress_with_cidr_blocks = [
    {
      from_port   = 3306
      to_port     = 3306
      protocol    = "tcp"
      description = "MySQL access from within VPC"
      cidr_blocks = module.vpc.vpc_cidr_block
    },
  ]
  # Egress Rule - all-all open
  egress_rules = ["all-all"]
  tags = local.common_tags
}
Step-03-02: c13-01-rdsdb-variables.tf
- Understand about Terraform Variables
Sensitive Flag
# Terraform AWS RDS Database Variables
# Place holder file for AWS RDS Database

# DB Name
variable "db_name" {
  description = "AWS RDS Database Name"
  type        = string
}
# DB Instance Identifier
variable "db_instance_identifier" {
  description = "AWS RDS Database Instance Identifier"
  type        = string
}
# DB Username - Enable Sensitive flag
variable "db_username" {
  description = "AWS RDS Database Administrator Username"
  type        = string
}
# DB Password - Enable Sensitive flag
variable "db_password" {
  description = "AWS RDS Database Administrator Password"
  type        = string
  sensitive   = true
}
Step-03-03: rdsdb.auto.tfvars
# RDS Database Variables
db_name = "webappdb"
db_instance_identifier = "webappdb"
db_username = "dbadmin"
Step-03-04: secrets.tfvars
db_password = "dbpassword11"
Step-03-05: c13-02-rdsdb.tf
# Create AWS RDS Database
module "rdsdb" {
  source  = "terraform-aws-modules/rds/aws"
  #version = "2.34.0"
  version = "3.0.0"

  identifier = var.db_instance_identifier

  name     = var.db_name  # Initial Database Name
  username = var.db_username
  password = var.db_password
  port     = 3306


  multi_az               = true
  subnet_ids             = module.vpc.database_subnets
  vpc_security_group_ids = [module.rdsdb_sg.security_group_id]

  # All available versions: http://docs.aws.amazon.com/AmazonRDS/latest/UserGuide/CHAP_MySQL.html#MySQL.Concepts.VersionMgmt
  engine               = "mysql"
  engine_version       = "8.0.20"
  family               = "mysql8.0" # DB parameter group
  major_engine_version = "8.0"      # DB option group
  instance_class       = "db.t3.large"

  allocated_storage     = 20
  max_allocated_storage = 100
  storage_encrypted     = false


  maintenance_window              = "Mon:00:00-Mon:03:00"
  backup_window                   = "03:00-06:00"
  enabled_cloudwatch_logs_exports = ["general"]

  backup_retention_period = 0
  skip_final_snapshot     = true
  deletion_protection     = false

  performance_insights_enabled          = true
  performance_insights_retention_period = 7
  create_monitoring_role                = true
  monitoring_interval                   = 60

  parameters = [
    {
      name  = "character_set_client"
      value = "utf8mb4"
    },
    {
      name  = "character_set_server"
      value = "utf8mb4"
    }
  ]

  tags = local.common_tags
  db_instance_tags = {
    "Sensitive" = "high"
  }
  db_option_group_tags = {
    "Sensitive" = "low"
  }
  db_parameter_group_tags = {
    "Sensitive" = "low"
  }
  db_subnet_group_tags = {
    "Sensitive" = "high"
  }
}
Step-03-06: c13-03-rdsdb-outputs.tf
# RDS DB Outputs
output "db_instance_address" {
  description = "The address of the RDS instance"
  value       = module.rdsdb.db_instance_address
}

output "db_instance_arn" {
  description = "The ARN of the RDS instance"
  value       = module.rdsdb.db_instance_arn
}

output "db_instance_availability_zone" {
  description = "The availability zone of the RDS instance"
  value       = module.rdsdb.db_instance_availability_zone
}

output "db_instance_endpoint" {
  description = "The connection endpoint"
  value       = module.rdsdb.db_instance_endpoint
}

output "db_instance_hosted_zone_id" {
  description = "The canonical hosted zone ID of the DB instance (to be used in a Route 53 Alias record)"
  value       = module.rdsdb.db_instance_hosted_zone_id
}

output "db_instance_id" {
  description = "The RDS instance ID"
  value       = module.rdsdb.db_instance_id
}

output "db_instance_resource_id" {
  description = "The RDS Resource ID of this instance"
  value       = module.rdsdb.db_instance_resource_id
}

output "db_instance_status" {
  description = "The RDS instance status"
  value       = module.rdsdb.db_instance_status
}

output "db_instance_name" {
  description = "The database name"
  value       = module.rdsdb.db_instance_name
}

output "db_instance_username" {
  description = "The master username for the database"
  value       = module.rdsdb.db_instance_username
  sensitive   = true
}

output "db_instance_password" {
  description = "The database password (this password may be old, because Terraform doesn't track it after initial creation)"
  value       = module.rdsdb.db_instance_password
  sensitive   = true
}

output "db_instance_port" {
  description = "The database port"
  value       = module.rdsdb.db_instance_port
}

output "db_subnet_group_id" {
  description = "The db subnet group name"
  value       = module.rdsdb.db_subnet_group_id
}

output "db_subnet_group_arn" {
  description = "The ARN of the db subnet group"
  value       = module.rdsdb.db_subnet_group_arn
}

output "db_parameter_group_id" {
  description = "The db parameter group id"
  value       = module.rdsdb.db_parameter_group_id
}

output "db_parameter_group_arn" {
  description = "The ARN of the db parameter group"
  value       = module.rdsdb.db_parameter_group_arn
}

output "db_enhanced_monitoring_iam_role_arn" {
  description = "The Amazon Resource Name (ARN) specifying the monitoring role"
  value       = module.rdsdb.enhanced_monitoring_iam_role_arn
}
Step-04: Create new EC2 Instance Module for App3 UMS
- UMS: User Management Web Application
- Create EC2 Instance Module for new App3
- Create
tmpl file for userdata (Use Terraform templatefle function)
- Create Outputs for EC2 Instance
- App Port 8080 inbound rule added to Private_SG module
"http-8080-tcp"
- Terraform templatefile function
templatefile reads the file at the given path and renders its content as a template using a supplied set of template variables.
# Change Directory
cd 13-DNS-to-DB/templatefile-function-demo
# Terraform Console
terraform console

# Terraform Tempaltefile Function
templatefile("app3-ums-install.tmpl",{rds_db_endpoint = "mydatabase"})
Step-04-02: app3-ums-install.tmpl
#! /bin/bash
sudo amazon-linux-extras enable java-openjdk11
sudo yum clean metadata && sudo yum -y install java-11-openjdk
mkdir /home/ec2-user/app3-usermgmt && cd /home/ec2-user/app3-usermgmt
wget https://github.com/stacksimplify/temp1/releases/download/1.0.0/usermgmt-webapp.war -P /home/ec2-user/app3-usermgmt
export DB_HOSTNAME=${rds_db_endpoint}
export DB_PORT=3306
export DB_NAME=webappdb
export DB_USERNAME=dbadmin
export DB_PASSWORD=dbpassword11
java -jar /home/ec2-user/app3-usermgmt/usermgmt-webapp.war > /home/ec2-user/app3-usermgmt/ums-start.log &
Step-04-03: c7-06-ec2instance-private-app3.tf
# AWS EC2 Instance Terraform Module
# EC2 Instances that will be created in VPC Private Subnets for App2
module "ec2_private_app3" {
  depends_on = [ module.vpc ] # VERY VERY IMPORTANT else userdata webserver provisioning will fail
  source  = "terraform-aws-modules/ec2-instance/aws"
  #version = "2.17.0"
  version = "3.0.0"
  # insert the 10 required variables here
  name                   = "${var.environment}-app3"
  ami                    = data.aws_ami.amzlinux2.id
  instance_type          = var.instance_type
  key_name               = var.instance_keypair
  #monitoring             = true
  #vpc_security_group_ids = [module.private_sg.this_security_group_id]
  vpc_security_group_ids = [module.private_sg.security_group_id]
  #subnet_id              = module.vpc.public_subnets[0]
  subnet_ids = [
    module.vpc.private_subnets[0],
    module.vpc.private_subnets[1]
  ]
  instance_count         = var.private_instance_count
  #user_data = file("${path.module}/app3-ums-install.tmpl") - THIS WILL NOT WORK, use Terraform templatefile function as below.
  #https://www.terraform.io/docs/language/functions/templatefile.html
  user_data =  templatefile("app3-ums-install.tmpl",{rds_db_endpoint = module.rdsdb.db_instance_address})
  tags = local.common_tags
}
Step-04-04: c7-02-ec2instance-outputs.tf
- Create Outputs for new App3 EC2 Instance
# App3 - Private EC2 Instances
## ec2_private_instance_ids
output "app3_ec2_private_instance_ids" {
  description = "List of IDs of instances"
  value       = module.ec2_private_app3.id
}
## ec2_private_ip
output "app3_ec2_private_ip" {
  description = "List of private IP addresses assigned to the instances"
  value       = module.ec2_private_app3.private_ip
}
Step-04-05: c5-04-securitygroup-privatesg.tf
ingress_rules = ["ssh-tcp", "http-80-tcp", "http-8080-tcp"]
Step-05: c10-02-ALB-application-loadbalancer.tf
- Create ALB TG for App3 UMS with Port 8080
- Enable Stickiness for App3 UMS TG
- Create HTTPS Listener Rule for (/*)
- Listener Rule Priorities like
priority = 1
Step-05-01: Create App3 Target Group
- Create App3 Target Group
- Discuss exclusively about
stickiness block
    # App3 Target Group - TG Index = 2
    {
      name_prefix          = "app3-"
      backend_protocol     = "HTTP"
      backend_port         = 80
      target_type          = "instance"
      deregistration_delay = 10
      health_check = {
        enabled             = true
        interval            = 30
        path                = "/login"
        port                = "traffic-port"
        healthy_threshold   = 3
        unhealthy_threshold = 3
        timeout             = 6
        protocol            = "HTTP"
        matcher             = "200-399"
      }
      stickiness = {
        enabled = true
        cookie_duration = 86400
        type = "lb_cookie"
      }
      protocol_version = "HTTP1"
      # App3 Target Group - Targets
      targets = {
        my_app3_vm1 = {
          target_id = module.ec2_private_app3.id[0]
          port      = 8080
        },
        my_app3_vm2 = {
          target_id = module.ec2_private_app3.id[1]
          port      = 8080
        }
      }
      tags =local.common_tags # Target Group Tags
    }
Step-05-02: Create Listener Rules for App3
    # Rule-3: /* should go to App3 - User-mgmt-WebApp EC2 Instances
    {
      https_listener_index = 0
      priority = 3
      actions = [
        {
          type               = "forward"
          target_group_index = 2
        }
      ]
      conditions = [{
        path_patterns = ["/*"]
      }]
    },
Step-05-03: Implement Rule Priority for all 3 Listener Rules
- Listener Rule Priorities
- /app1*:
priority = 1
- /app2*:
priority = 2
- Root Context /*:
priority = 3
Step-06: Automate Jumpbox server to have mysql client installed
- Using jumpbox userdata,
mysql client should be auto-installed.
- We will use jumpbox to connect to RDS MySQL DB by installing MySQL Client
Step-06-01: jumpbox-install.sh
#! /bin/bash
sudo yum update -y
sudo rpm -e --nodeps mariadb-libs-*
sudo amazon-linux-extras enable mariadb10.5
sudo yum clean metadata
sudo yum install -y mariadb
sudo mysql -V
sudo yum install -y telnet
Step-07: c12-route53-dnsregistration.tf
- Update the DNS name as desired to match our demo
name = "dns-to-db1.devopsincloud.com"
# Terraform Init
terraform init

# Terraform Validate
terraform validate

# Terraform Plan
terraform plan -var-file="secrets.tfvars"

# Terraform Apply
terraform apply -var-file="secrets.tfvars"
Step-09: Verify AWS Resources cretion on Cloud
- EC2 Instances App1, App2, App3, Bastion Host
- RDS Databases
- ALB Listeners and Routing Rules
- ALB Target Groups App1, App2 and App3 if they are healthy
Step-10: Connect to DB
- Connect to Jumpbox to test if default db and tables created.
- Connect via Jumpbox to DB to verify webappdb, Tables and Content inside
# Connect to MySQL DB
mysql -h webappdb.cxojydmxwly6.us-east-1.rds.amazonaws.com -u dbadmin -pdbpassword11
mysql> show schemas;
mysql> use webappdb;
mysql> show tables;
mysql> select * from user;
- Important Note: If you the tables created and
default admin user present in user that confirms our User Management Web Application is up and running on App3 EC2 Instances
Step-11: Access Applications and Test
# App1
https://dns-to-db.devopsincloud.com/app1/index.html

# App2
https://dns-to-db.devopsincloud.com/app2/index.html

# App3
https://dns-to-db.devopsincloud.com
Username: admin101
Password: password101
1. Create a user, List User
2. Verify user in DB
Step-12: Additional Troubleshooting for App3
- Connect to App3 Instances
# Connect to App3 EC2 Instance from Jumpbox
ssh -i /tmp/terraform-key.pem ec2-user@<App3-Ec2Instance-1-Private-IP>

# Check logs
cd app3-usermgmt
more ums-start.log

# For further troubleshooting
- Shutdown one EC2 instance from App3 and test with 1 instance
Step-13: Clean-Up
# Destroy Resources
terraform destroy -auto-approve

# Delete Files
rm -rf .terraform*
rm -rf terraform.tfstate
References


