IaC DevOps using AWS CodePipeline
Step-00: Introduction
- Terraform Backend with backend-config
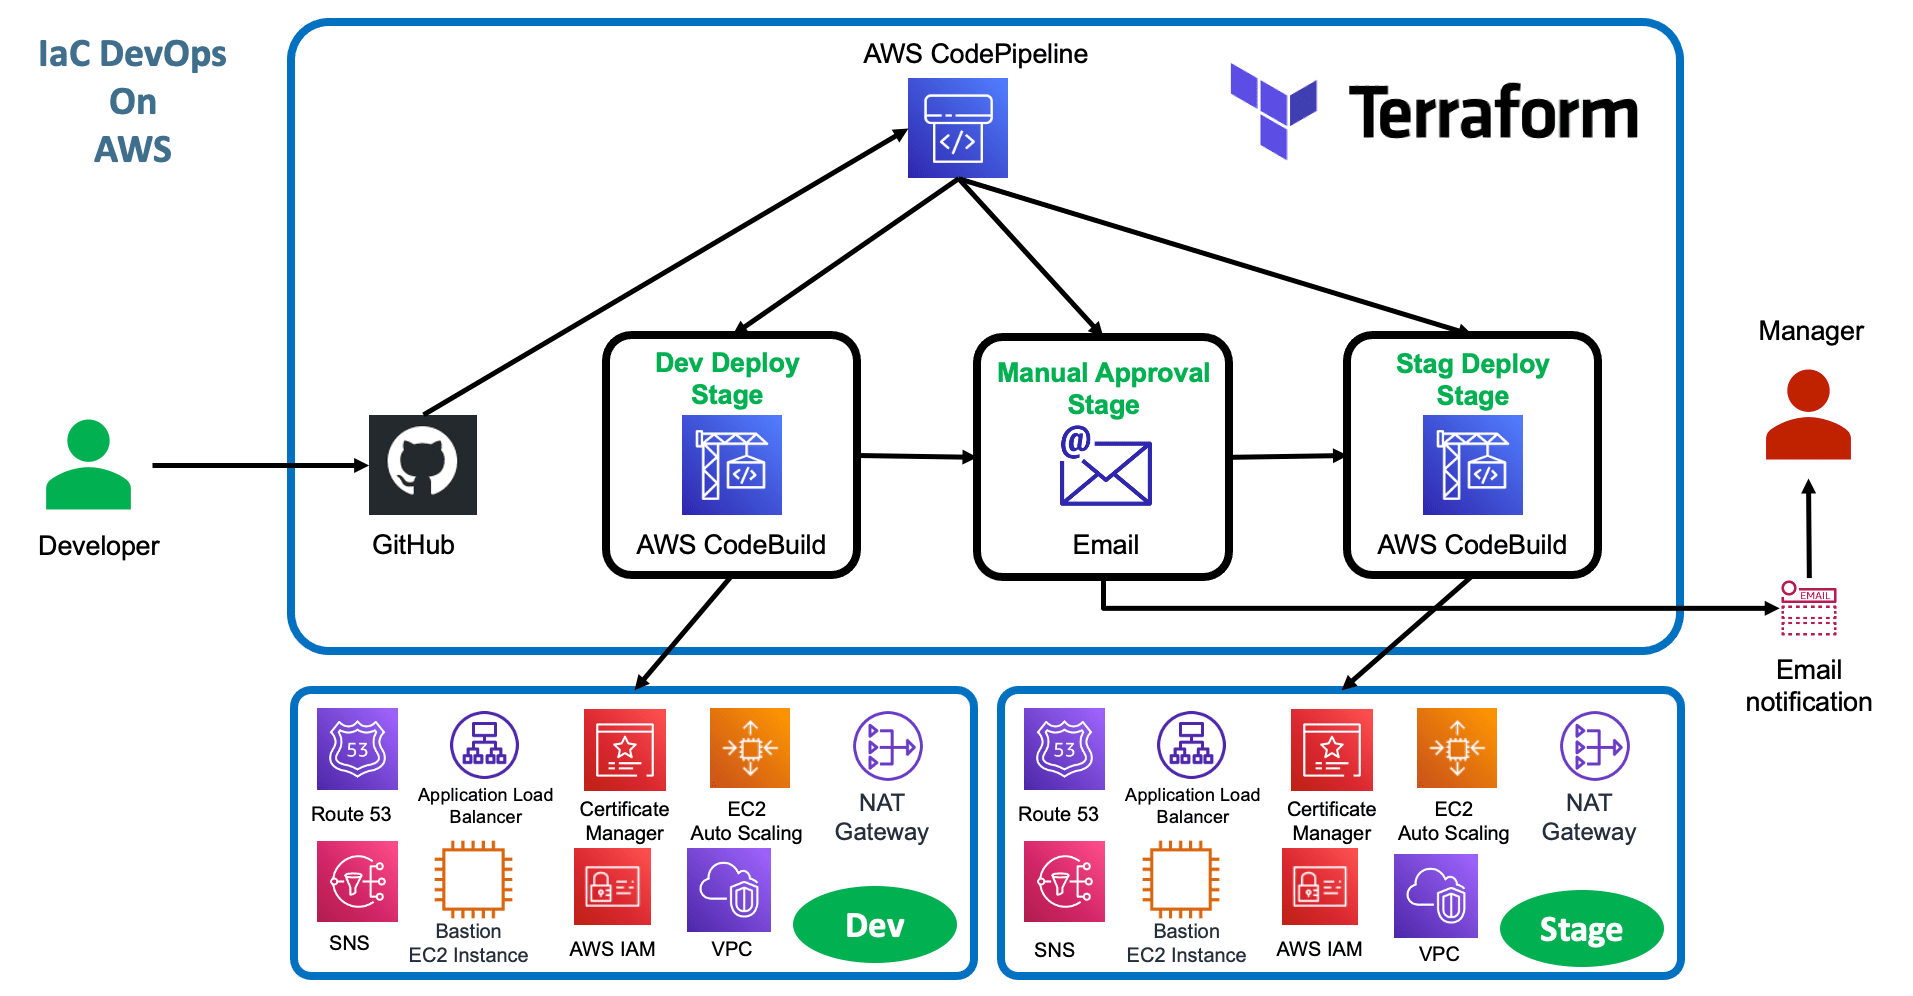
- How to create multiple environments related Pipeline with single TF Config files in Terraform ?
- As part of Multiple environments we are going to create
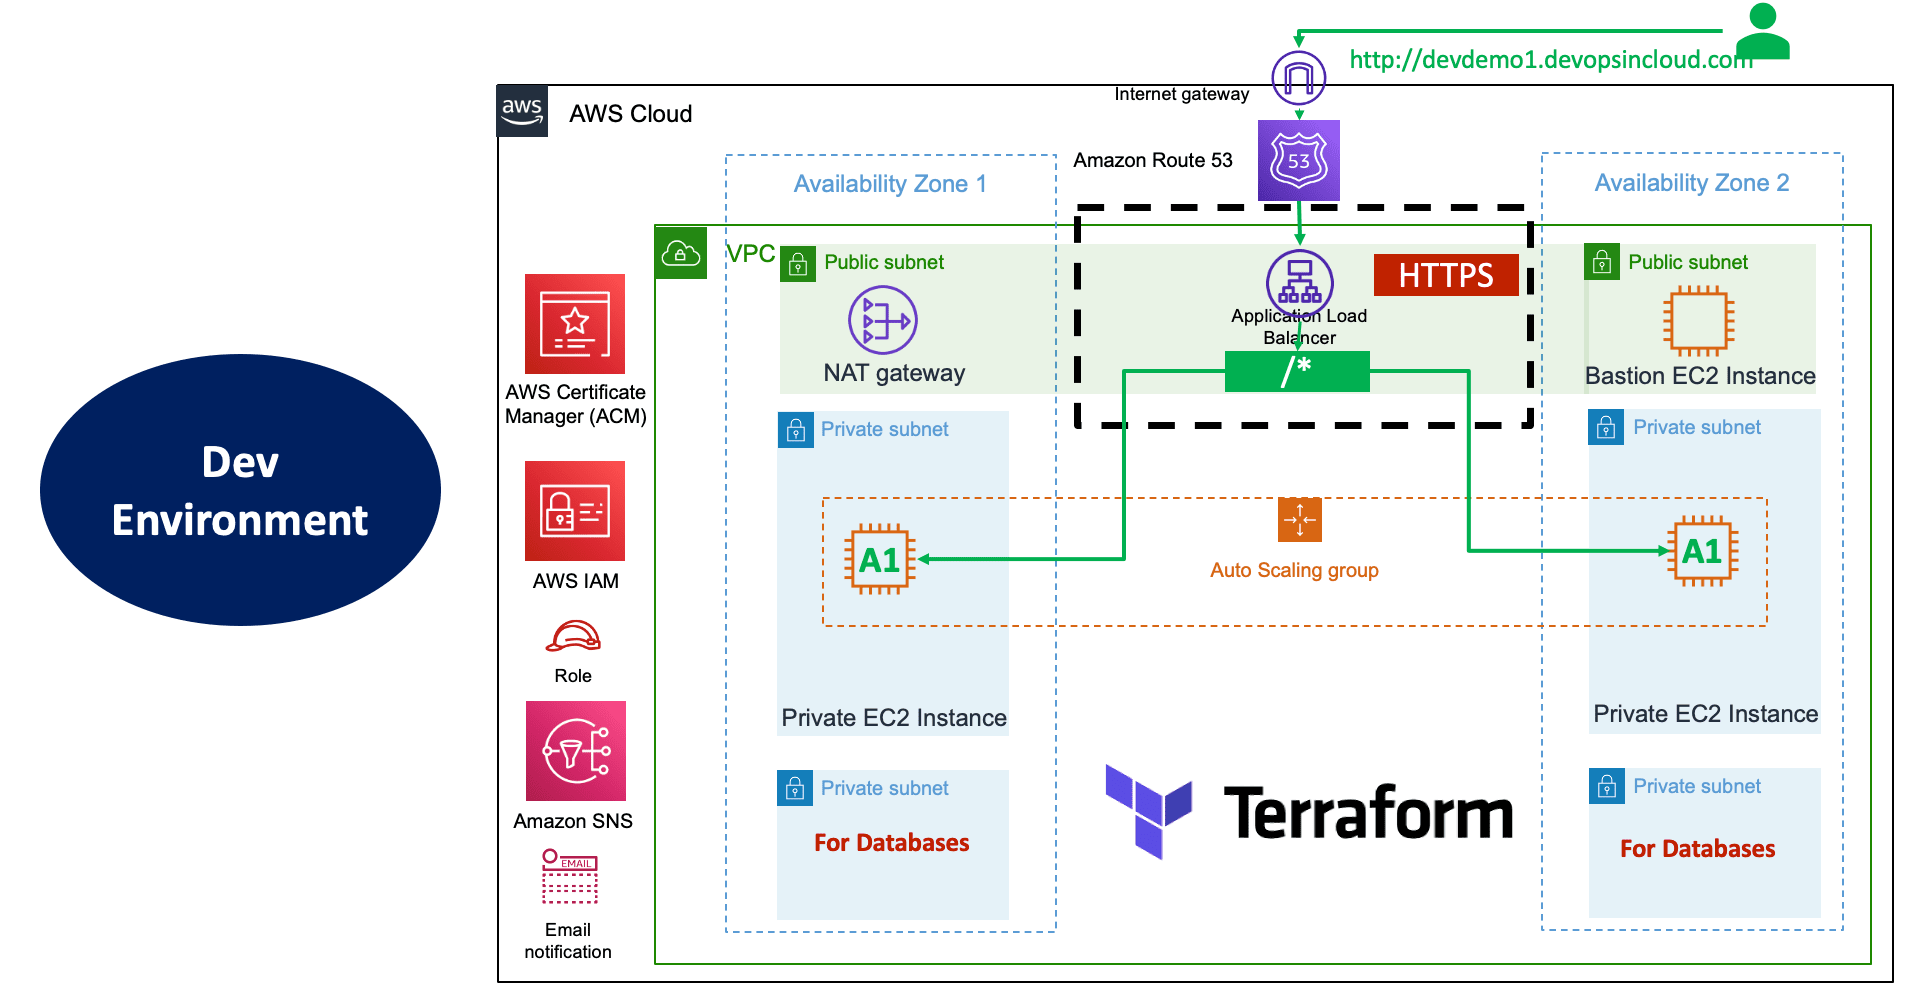
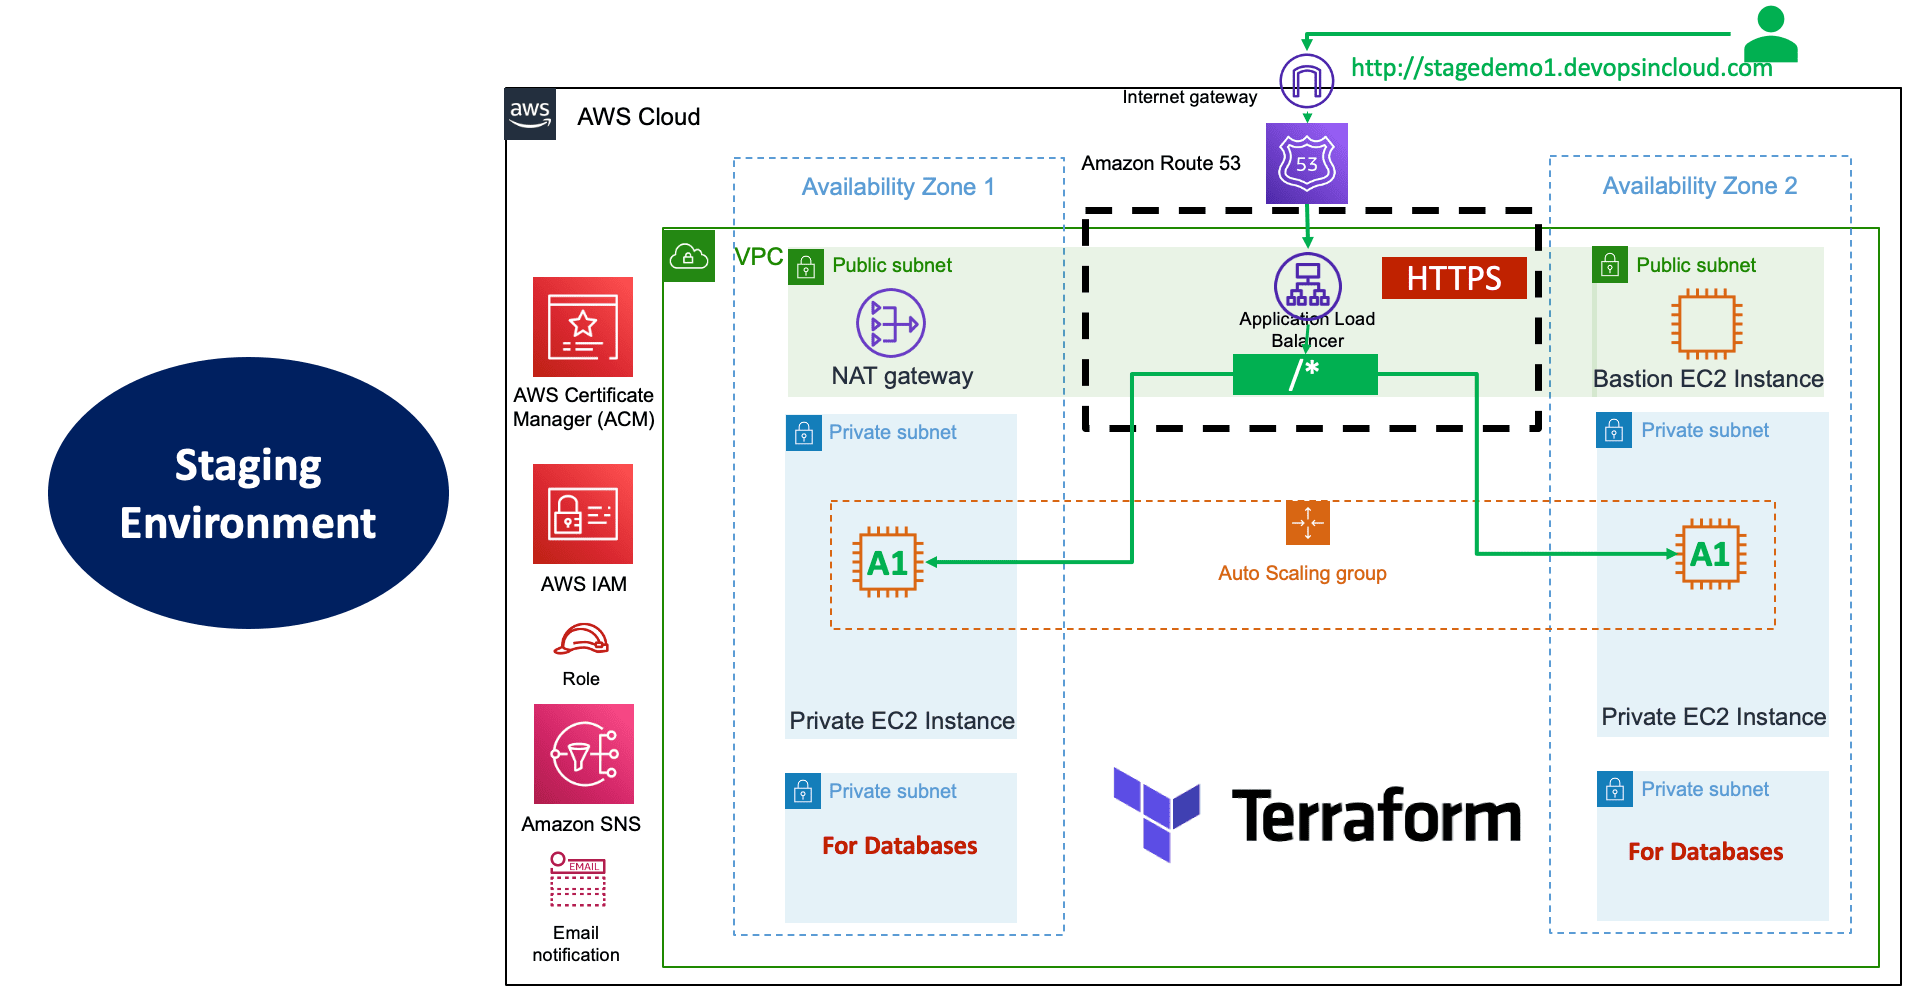
dev and stag environments
- We are going build IaC DevOps Pipelines using
- AWS CodeBuild
- AWS CodePipeline
- Github
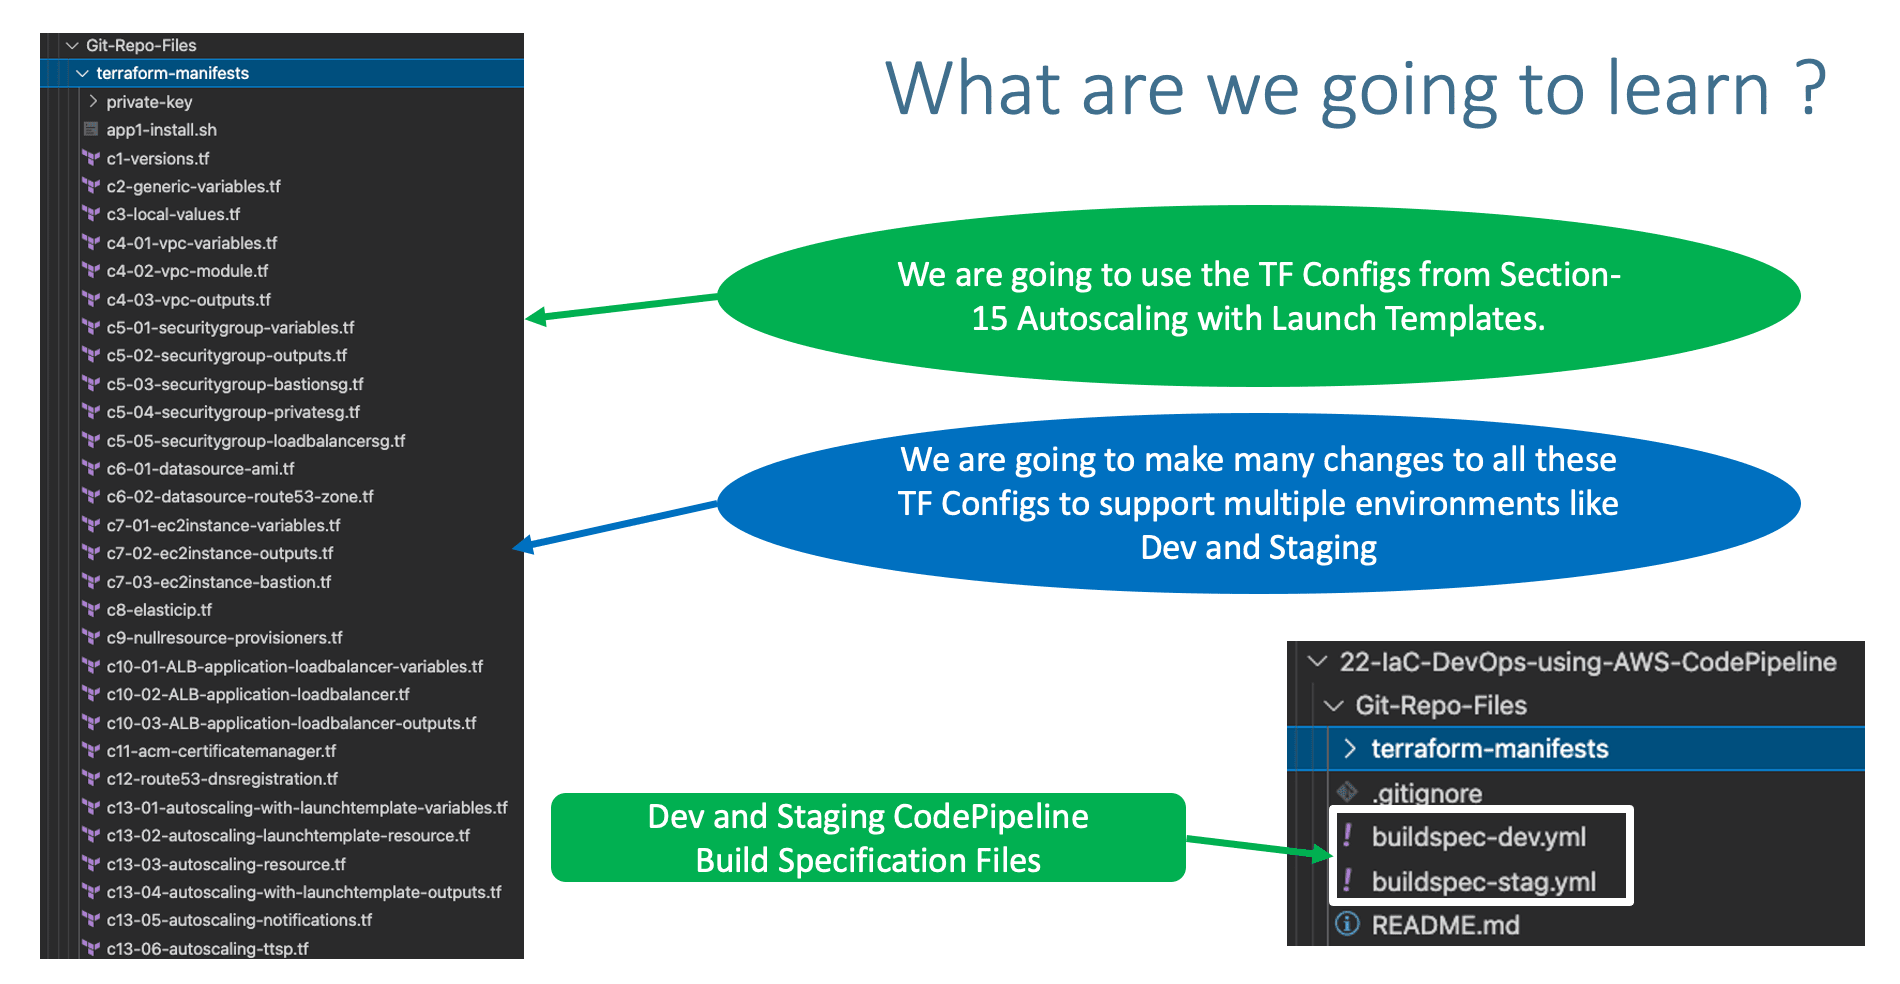
- We are going to streamline the
terraform-manifests taken from section-15 and streamline that to support Multiple environments.


- Copy
terraform-manifests from Section-15 15-Autoscaling-with-Launch-Templates
- Update
private-key\terraform-key.pem with your private key with same name.
Step-02-01 Add backend block as below
  # Adding Backend as S3 for Remote State Storage
  backend "s3" { }
Step-02-02: Create file named dev.conf
bucket = "terraform-on-aws-for-ec2"
key    = "iacdevops/dev/terraform.tfstate"
region = "us-east-1"
dynamodb_table = "iacdevops-dev-tfstate"
Step-02-03: Create file named stag.conf
bucket = "terraform-on-aws-for-ec2"
key    = "iacdevops/stag/terraform.tfstate"
region = "us-east-1"
dynamodb_table = "iacdevops-stag-tfstate"
- Go to Services -> S3 -> terraform-on-aws-for-ec2
- Create Folder
iacdevops
- Create Folder
iacdevops\dev
- Create Folder
iacdevops\stag
- Create Dynamo DB Table for Dev Environment
- Table Name: iacdevops-dev-tfstate
- Partition key (Primary Key): LockID (Type as String)
- Table settings: Use default settings (checked)
- Click on Create
- Create Dynamo DB Table for Staging Environment
- Table Name: iacdevops-stag-tfstate
- Partition key (Primary Key): LockID (Type as String)
- Table settings: Use default settings (checked)
- Click on Create
Step-03: Pipeline Build Out - Decisions
- We have two options here.
Step-03-01: Option-1: Create separate folders per environment and have same TF Config files (c1 to c13) maintained per environment
- More work as we need to manage many environment related configs
- Dev - C1 to C13 - Approximate 30 files
- QA - C1 to C13 - Approximate 30 files
- Stg - C1 to C13 - Approximate 30 files
- Prd - C1 to C13 - Approximate 30 files
- DR - C1 to C13 - Approximate 30 files
- Close to 150 files you need to manage changes.
- For critical projects which you want to isolate as above, Terraform also recommends this approach but its all case to case basis on the environment we have built, skill level and organization level standards.
Step-03-02: Option-2: Create only 1 folder and leverage same C1 to C13 files (approx 30 files) across environments.
- Only 30 files to manage across Dev, QA, Staging, Production and DR environments.
- We are going to take this
option-2 and build the pipeline for Dev and Staging environments
Step-04: Merge vpc.auto.tfvars and ec2instance.auto.tfvars
- Merge
vpc.auto.tfvars and ec2instance.auto.tfvars to environment specific .tfvars example dev.tfvars and stag.tfvats
- Also don't provide
.auto. in dev.tfvars or stag.tfvars if we want to leverage same TF Config files across environmets.
- We are going to pass the
.tfvars file as -var-file argument to terraform apply command
terraform apply -input=false -var-file=dev.tfvars -auto-approve
Step-04-01: dev.tfvars
# Environment
environment = "dev"
# VPC Variables
vpc_name = "myvpc"
vpc_cidr_block = "10.0.0.0/16"
vpc_availability_zones = ["us-east-1a", "us-east-1b", "us-east-1c"]
vpc_public_subnets = ["10.0.101.0/24", "10.0.102.0/24", "10.0.103.0/24"]
vpc_private_subnets = ["10.0.1.0/24", "10.0.2.0/24", "10.0.3.0/24"]
vpc_database_subnets= ["10.0.151.0/24", "10.0.152.0/24", "10.0.153.0/24"]
vpc_create_database_subnet_group = true
vpc_create_database_subnet_route_table = true
vpc_enable_nat_gateway = true
vpc_single_nat_gateway = true

# EC2 Instance Variables
instance_type = "t3.micro"
instance_keypair = "terraform-key"
private_instance_count = 2
Step-04-01: stag.tfvars
# Environment
environment = "stag"
# VPC Variables
vpc_name = "myvpc"
vpc_cidr_block = "10.0.0.0/16"
vpc_availability_zones = ["us-east-1a", "us-east-1b", "us-east-1c"]
vpc_public_subnets = ["10.0.101.0/24", "10.0.102.0/24", "10.0.103.0/24"]
vpc_private_subnets = ["10.0.1.0/24", "10.0.2.0/24", "10.0.3.0/24"]
vpc_database_subnets= ["10.0.151.0/24", "10.0.152.0/24", "10.0.153.0/24"]
vpc_create_database_subnet_group = true
vpc_create_database_subnet_route_table = true
vpc_enable_nat_gateway = true
vpc_single_nat_gateway = true

# EC2 Instance Variables
instance_type = "t3.micro"
instance_keypair = "terraform-key"
private_instance_count = 2
- Remove / Delete the following two files
- vpc.auto.tfvars
- ec2instance.auto.tfvars
terraform.tfvars which autoloads for all environment creations will have only generic variables.
# Generic Variables
aws_region = "us-east-1"
business_divsion = "hr"
Step-06: Remove local-exec Provisioners
Step-06-01: c9-nullresource-provisioners.tf
- Remove Local Exec Provisioner which is not applicable in CodePipeline -> CodeBuild case.
## Local Exec Provisioner:  local-exec provisioner (Creation-Time Provisioner - Triggered during Create Resource)
 provisioner "local-exec" {
    command = "echo VPC created on `date` and VPC ID: ${module.vpc.vpc_id} >> creation-time-vpc-id.txt"
    working_dir = "local-exec-output-files/"
    #on_failure = continue
  }
- Remove the folder
local-exec-output-files
Step-06-02: c8-elasticip.tf
- Remove Local Exec Provisioner which is not applicable in CodePipeline -> CodeBuild case.
## Local Exec Provisioner:  local-exec provisioner (Destroy-Time Provisioner - Triggered during deletion of Resource)
  provisioner "local-exec" {
    command = "echo Destroy time prov `date` >> destroy-time-prov.txt"
    working_dir = "local-exec-output-files/"
    when = destroy
    #on_failure = continue
  }
Step-07: To Support Multiple Environments
Step-07-01: c5-03-securitygroup-bastionsg.tf
# Before
  name = "public-bastion-sg"
# After
  name = "${local.name}-public-bastion-sg"
Step-07-02: c5-04-securitygroup-privatesg.tf
# Before
  name = "private-sg"
# After
  name = "${local-name}-private-sg"
Step-07-03: c5-05-securitygroup-loadbalancersg.tf
# Before
  name = "loadbalancer-sg"
# After
  name = "${local.name}-loadbalancer-sg"
Step-07-04: Create Variable for DNS Name to support multiple environments
Step-07-04-01: c12-route53-dnsregistration.tf
# DNS Name Input Variable
variable "dns_name" {
  description = "DNS Name to support multiple environments"
  type = string
}
Step-07-04-02: c12-route53-dnsregistration.tf
# DNS Registration
resource "aws_route53_record" "apps_dns" {
  zone_id = data.aws_route53_zone.mydomain.zone_id
  name    = var.dns_name
  type    = "A"
  alias {
    name                   = module.alb.lb_dns_name
    zone_id                = module.alb.lb_zone_id
    evaluate_target_health = true
  }
}
Step-07-04-03: dev.tfvars
# DNS Name
dns_name = "devdemo1.devopsincloud.com"
Step-07-04-04: stag.tfvars
# DNS Name
dns_name = "stagedemo1.devopsincloud.com"
Step-07-05: c11-acm-certificatemanager.tf
- In your case, the domain names will change as per this step.
# Before
  subject_alternative_names = [
    "*.devopsincloud.com"
  ]

# After
  subject_alternative_names = [
    #"*.devopsincloud.com"
    var.dns_name
  ]
Step-07-06: c13-02-autoscaling-launchtemplate-resource.tf
# Before
  name = "my-launch-template"
# After
  name_prefix = "${local.name}-"
Step-07-07: c13-02-autoscaling-launchtemplate-resource.tf
# Before
  tag_specifications {
    resource_type = "instance"
    tags = {
      Name = "myasg"
    }
  }
# After
  tag_specifications {
    resource_type = "instance"
    tags = {
      #Name = "myasg"
      Name = local.name
    }
  }
Step-07-08: c13-03-autoscaling-resource.tf
# Before
  name_prefix = "myasg-"
# After
  name_prefix = "${local.name}-"
Step-07-09: c13-06-autoscaling-ttsp.tf
# Before
  name = "avg-cpu-policy-greater-than-xx"
  name = "alb-target-requests-greater-than-yy"
# After
  name = "${local.name}-avg-cpu-policy-greater-than-xx"
  name = "${local.name}-alb-target-requests-greater-than-yy"
Step-08: Create Secure Parameters in Parameter Store
Step-08-01: Create MY_AWS_SECRET_ACCESS_KEY
- Go to Services -> Systems Manager -> Application Management -> Parameter Store -> Create Parameter
- Name: /CodeBuild/MY_AWS_ACCESS_KEY_ID
- Descritpion: My AWS Access Key ID for Terraform CodePipeline Project
- Tier: Standard
- Type: Secure String
- Rest all defaults
- Value: ABCXXXXDEFXXXXGHXXX
Step-08-02: Create MY_AWS_SECRET_ACCESS_KEY
- Go to Services -> Systems Manager -> Application Management -> Parameter Store -> Create Parameter
- Name: /CodeBuild/MY_AWS_SECRET_ACCESS_KEY
- Descritpion: My AWS Secret Access Key for Terraform CodePipeline Project
- Tier: Standard
- Type: Secure String
- Rest all defaults
- Value: abcdefxjkdklsa55dsjlkdjsakj
Step-09: buildspec-dev.yml
- Discuss about following Environment variables we are going to pass
- TERRAFORM_VERSION
- which version of terraform codebuild should use
- As on today
0.15.3 is latest we will use that
- TF_COMMAND
- We will use
apply to create resources
- We will use
destroy in CodeBuild Environment
- AWS_ACCESS_KEY_ID: /CodeBuild/MY_AWS_ACCESS_KEY_ID
- AWS Access Key ID is safely stored in Parameter Store
- AWS_SECRET_ACCESS_KEY: /CodeBuild/MY_AWS_SECRET_ACCESS_KEY
- AWS Secret Access Key is safely stored in Parameter Store
version: 0.2

env:
  variables:
    TERRAFORM_VERSION: "0.15.3"
    TF_COMMAND: "apply"
    #TF_COMMAND: "destroy"
  parameter-store:
    AWS_ACCESS_KEY_ID: "/CodeBuild/MY_AWS_ACCESS_KEY_ID"
    AWS_SECRET_ACCESS_KEY: "/CodeBuild/MY_AWS_SECRET_ACCESS_KEY"

phases:
  install:
    runtime-versions:
      python: 3.7
    on-failure: ABORT
    commands:
      - tf_version=$TERRAFORM_VERSION
      - wget https://releases.hashicorp.com/terraform/"$TERRAFORM_VERSION"/terraform_"$TERRAFORM_VERSION"_linux_amd64.zip
      - unzip terraform_"$TERRAFORM_VERSION"_linux_amd64.zip
      - mv terraform /usr/local/bin/
  pre_build:
    on-failure: ABORT
    commands:
      - echo terraform execution started on `date`
  build:
    on-failure: ABORT
    commands:
    # Project-1: AWS VPC, ASG, ALB, Route53, ACM, Security Groups and SNS
      - cd "$CODEBUILD_SRC_DIR/terraform-manifests"
      - ls -lrt "$CODEBUILD_SRC_DIR/terraform-manifests"
      - terraform --version
      - terraform init -input=false --backend-config=dev.conf
      - terraform validate
      - terraform plan -lock=false -input=false -var-file=dev.tfvars
      - terraform $TF_COMMAND -input=false -var-file=dev.tfvars -auto-approve
  post_build:
    on-failure: CONTINUE
    commands:
      - echo terraform execution completed on `date`
Step-10: buildspec-stag.yml
version: 0.2

env:
  variables:
    TERRAFORM_VERSION: "0.15.3"
    TF_COMMAND: "apply"
    #TF_COMMAND: "destroy"
  parameter-store:
    AWS_ACCESS_KEY_ID: "/CodeBuild/MY_AWS_ACCESS_KEY_ID"
    AWS_SECRET_ACCESS_KEY: "/CodeBuild/MY_AWS_SECRET_ACCESS_KEY"

phases:
  install:
    runtime-versions:
      python: 3.7
    on-failure: ABORT
    commands:
      - tf_version=$TERRAFORM_VERSION
      - wget https://releases.hashicorp.com/terraform/"$TERRAFORM_VERSION"/terraform_"$TERRAFORM_VERSION"_linux_amd64.zip
      - unzip terraform_"$TERRAFORM_VERSION"_linux_amd64.zip
      - mv terraform /usr/local/bin/
  pre_build:
    on-failure: ABORT
    commands:
      - echo terraform execution started on `date`
  build:
    on-failure: ABORT
    commands:
    # Project-1: AWS VPC, ASG, ALB, Route53, ACM, Security Groups and SNS
      - cd "$CODEBUILD_SRC_DIR/terraform-manifests"
      - ls -lrt "$CODEBUILD_SRC_DIR/terraform-manifests"
      - terraform --version
      - terraform init -input=false --backend-config=stag.conf
      - terraform validate
      - terraform plan -lock=false -input=false -var-file=stag.tfvars
      - terraform $TF_COMMAND -input=false -var-file=stag.tfvars -auto-approve
  post_build:
    on-failure: CONTINUE
    commands:
      - echo terraform execution completed on `date`
Step-11: Create Github Repository and Check-In file
Step-11-01: Create New Github Repository
- Go to github.com and login with your credentials
- URL: https://github.com/stacksimplify (my git repo url)
- Click on Repositories Tab
- Click on New to create a new repository
- Repository Name: terraform-iacdevops-with-aws-codepipeline
- Description: Implement Terraform IAC DevOps for AWS Project with AWS CodePipeline
- Repository Type: Private
- Choose License: Apache License 2.0
- Click on Create Repository
- Click on Code and Copy Repo link
# Change Directory
cd demo-repos

# Execute Git Clone
git clone https://github.com/stacksimplify/terraform-iacdevops-with-aws-codepipeline.git

# Copy all files from Section-22 Git-Repo-Files folder
1. Source Folder Path: 22-IaC-DevOps-using-AWS-CodePipeline/Git-Repo-Files
2. Copy all files from Source Folder to Destination Folder
3. Destination Folder Path: demo-repos/terraform-iacdevops-with-aws-codepipeline

# Verify Git Status
git status

# Git Commit
git commit -am "First Commit"

# Push files to Remote Repository
git push

# Verify same on Remote Repository
https://github.com/stacksimplify/terraform-iacdevops-with-aws-codepipeline.git
Step-12: Verify if AWS Connector for GitHub already installed on your Github
- Go to below url and verify
- URL: https://github.com/settings/installations
- Go to Services -> CodePipeline -> Create Pipeline
- In Developer Tools -> Click on Settings -> Connections -> Create Connection
- Select Provider: Github
- Connection Name: terraform-iacdevops-aws-cp-con1
- Click on Connect to Github
- GitHub Apps: Click on Install new app
- It should redirect to github page
Install AWS Connector for GitHub
- Only select repositories: terraform-iacdevops-with-aws-codepipeline
- Click on Install
- Click on Connect
- Verify Connection Status: It should be in Available state
- Go to below url and verify
- URL: https://github.com/settings/installations
- You should see
Install AWS Connector for GitHub app installed
Step-14: Create AWS CodePipeline
- Go to Services -> CodePipeline -> Create Pipeline
Pipeline settings
- Pipeline Name: tf-iacdevops-aws-cp1
- Service role: New Service Role
- rest all defaults
- Artifact store: Default Location
- Encryption Key: Default AWS Managed Key
- Click Next
Source Stage
- Source Provider: Github (Version 2)
- Connection: terraform-iacdevops-aws-cp-con1
- Repository name: terraform-iacdevops-with-aws-codepipeline
- Branch name: main
- Change detection options: leave to defaults as checked
- Output artifact format: leave to defaults as
CodePipeline default
Add Build Stage
- Build Provider: AWS CodeBuild
- Region: N.Virginia
- Project Name: Click on Create Project
- Project Name: codebuild-tf-iacdevops-aws-cp1
- Description: CodeBuild Project for Dev Stage of IAC DevOps Terraform Demo
- Environment image: Managed Image
- Operating System: Amazon Linux 2
- Runtimes: Standard
- Image: latest available today (aws/codebuild/amazonlinux2-x86_64-standard:3.0)
- Environment Type: Linux
- Service Role: New (leave to defaults including Role Name)
- Build specifications: use a buildspec file
- Buildspec name - optional: buildspec-dev.yml (Ensure that this file is present in root folder of your github repository)
- Rest all leave to defaults
- Click on Continue to CodePipeline
- Project Name: This value should be auto-populated with
codebuild-tf-iacdevops-aws-cp1
- Build Type: Single Build
- Click Next
Add Deploy Stage
- Click on Skip Deploy Stage
Review Stage
Step-15: Verify the Pipeline created
- Verify Source Stage: Should pass
- Verify Build Stage: should fail with error
- Verify Build Stage logs by clicking on details in pipeline screen
[Container] 2021/05/11 06:24:06 Waiting for agent ping
[Container] 2021/05/11 06:24:09 Waiting for DOWNLOAD_SOURCE
[Container] 2021/05/11 06:24:09 Phase is DOWNLOAD_SOURCE
[Container] 2021/05/11 06:24:09 CODEBUILD_SRC_DIR=/codebuild/output/src851708532/src
[Container] 2021/05/11 06:24:09 YAML location is /codebuild/output/src851708532/src/buildspec-dev.yml
[Container] 2021/05/11 06:24:09 Processing environment variables
[Container] 2021/05/11 06:24:09 Decrypting parameter store environment variables
[Container] 2021/05/11 06:24:09 Phase complete: DOWNLOAD_SOURCE State: FAILED
[Container] 2021/05/11 06:24:09 Phase context status code: Decrypted Variables Error Message: AccessDeniedException: User: arn:aws:sts::180789647333:assumed-role/codebuild-codebuild-tf-iacdevops-aws-cp1-service-role/AWSCodeBuild-97595edc-1db1-4070-97a0-71fa862f0993 is not authorized to perform: ssm:GetParameters on resource: arn:aws:ssm:us-east-1:180789647333:parameter/CodeBuild/MY_AWS_ACCESS_KEY_ID
Step-16: Fix ssm:GetParameters IAM Role issues
Step-16-01: Get IAM Service Role used by CodeBuild Project
- Get the IAM Service Role name CodeBuild Project is using
- Go to CodeBuild -> codebuild-tf-iacdevops-aws-cp1 -> Edit -> Environment
- Make a note of Service Role ARN
# CodeBuild Service Role ARN
arn:aws:iam::180789647333:role/service-role/codebuild-codebuild-tf-iacdevops-aws-cp1-service-role
Step-16-02: Create IAM Policy with Systems Manager Get Parameter Read Permission
- Go to Services -> IAM -> Policies -> Create Policy
- Service: Systems Manager
- Actions: Get Parameters (Under Read)
- Resources: All
- Click Next Tags
- Click Next Review
- Policy name: systems-manger-get-parameter-access
- Policy Description: Read Parameters from Parameter Store in AWS Systems Manager Service
- Click on Create Policy
Step-16-03: Associate this Policy to IAM Role
- Go to Services -> IAM -> Roles -> Search for
codebuild-codebuild-tf-iacdevops-aws-cp1-service-role
- Attach the polic named
systems-manger-get-parameter-access
Step-17: Re-run the CodePipeline
- Go to Services -> CodePipeline -> tf-iacdevops-aws-cp1
- Click on Release Change
- Verify Source Stage:
- Should pass
- Verify Build Stage:
- Verify Build Stage logs by clicking on details in pipeline screen
- Verify
Cloudwatch -> Log Groups logs too (Logs saved in CloudWatch for additional reference)
Step-18: Verify Resources
- Confirm SNS Subscription in your email
- Verify EC2 Instances
- Verify Launch Templates (High Level)
- Verify Autoscaling Group (High Level)
- Verify Load Balancer
- Verify Load Balancer Target Group - Health Checks
- Access and Test
# Access and Test
http://devdemo1.devopsincloud.com
http://devdemo1.devopsincloud.com/app1/index.html
http://devdemo1.devopsincloud.com/app1/metadata.html
Step-19: Add Approval Stage before deploying to staging environment
- Go to Services -> AWS CodePipeline -> tf-iacdevops-aws-cp1 -> Edit
Add Stage
Add Action Group
- Action Name: Email-Approval
- Action Provider: Manual Approval
- SNS Topic: Select SNS Topic from drop down
- Comments: Approve to deploy to staging environment
Step-20: Add Staging Environment Deploy Stage
- Go to Services -> AWS CodePipeline -> tf-iacdevops-aws-cp1 -> Edit
Add Stage
Add Action Group
- Action Name: Stage-Deploy
- Region: US East (N.Virginia)
- Action Provider: AWS CodeBuild
- Input Artifacts: Source Artifact
- Project Name: Click on Create Project
- Project Name: stage-deploy-tf-iacdevops-aws-cp1
- Description: CodeBuild Project for Staging Environment of IAC DevOps Terraform Demo
- Environment image: Managed Image
- Operating System: Amazon Linux 2
- Runtimes: Standard
- Image: latest available today (aws/codebuild/amazonlinux2-x86_64-standard:3.0)
- Environment Type: Linux
- Service Role: New (leave to defaults including Role Name)
- Build specifications: use a buildspec file
- Buildspec name - optional: buildspec-stag.yml (Ensure that this file is present in root folder of your github repository)
- Rest all leave to defaults
- Click on Continue to CodePipeline
- Project Name: This value should be auto-populated with
stage-deploy-tf-iacdevops-aws-cp1
- Build Type: Single Build
- Click on Done
- Click on Save
Step-21: Update the IAM Role
- Update the IAM Role created as part of this
stage-deploy-tf-iacdevops-aws-cp1 CodeBuild project by adding the policy systems-manger-get-parameter-access1
Step-22: Run the Pipeline
- Go to Services -> AWS CodePipeline -> tf-iacdevops-aws-cp1
- Click on Release Change
- Verify Source Stage
- Verify Build Stage (Dev Environment - Dev Depploy phase)
- Verify Manual Approval Stage - Approve the change
- Verify Stage Deploy Stage
- Verify build logs
Step-23: Verify Staging Environment
- Confirm SNS Subscription in your email
- Verify EC2 Instances
- Verify Launch Templates (High Level)
- Verify Autoscaling Group (High Level)
- Verify Load Balancer
- Verify Load Balancer Target Group - Health Checks
- Access and Test
# Access and Test
http://stagedemo1.devopsincloud.com
http://stagedemo1.devopsincloud.com/app1/index.html
http://stagedemo1.devopsincloud.com/app1/metadata.html
Step-24: Make a change and test the entire pipeline
Step-24-01: c13-03-autoscaling-resource.tf
- Increase minimum EC2 Instances from 2 to 3
# Before
  desired_capacity = 2
  max_size = 10
  min_size = 2
# After
  desired_capacity = 4
  max_size = 10
  min_size = 4
Step-24-02: Commit Changes via Git Repo
# Verify Changes
git status

# Commit Changes to Local Repository
git add .
git commit -am "ASG Min Size from 2 to 4"

# Push changes to Remote Repository
git push
Step-24-03: Review Build Logs
- Go to Services -> CodePipeline -> tf-iacdevops-aws-cp1
- Verify Dev Deploy Logs
- Approve at
Manual Approval stage
- Verify Stage Deploy Logs
Step-24-04: Verify EC2 Instances
- Go to Services -> EC2 Instances
- Newly created instances should be visible.
- hr-dev: 4 EC2 Instances
- hr-stag: 4 EC2 Instances
Step-25: Destroy Resources
Step-25-01: Update buildspec-dev.yml
# Before
    TF_COMMAND: "apply"
    #TF_COMMAND: "destroy"
# After
    #TF_COMMAND: "apply"
    TF_COMMAND: "destroy"
Step-25-02: Update buildspec-stag.yml
# Before
    TF_COMMAND: "apply"
    #TF_COMMAND: "destroy"
# After
    #TF_COMMAND: "apply"
    TF_COMMAND: "destroy"
Step-25-03: Commit Changes via Git Repo
# Verify Changes
git status

# Commit Changes to Local Repository
git add .
git commit -am "Destroy Resources"

# Push changes to Remote Repository
git push
Step-25-03: Review Build Logs
- Go to Services -> CodePipeline -> tf-iacdevops-aws-cp1
- Verify Dev Deploy Logs
- Approve at
Manual Approval stage
- Verify Stage Deploy Logs
Step-26: Change Everything back to original Demo State
Step-26-01: c13-03-autoscaling-resource.tf
- Change them back to original state
# Before
  desired_capacity = 4
  max_size = 10
  min_size = 4
# After
  desired_capacity = 2
  max_size = 10
  min_size = 2
Step-26-02: buildspec-dev.yml and buildspec-stag.yml
- Change them back to original state
# Before
    #TF_COMMAND: "apply"
    TF_COMMAND: "destroy"
# After
    TF_COMMAND: "apply"
    #TF_COMMAND: "destroy"
Step-26-03: Commit Changes via Git Repo
# Verify Changes
git status

# Commit Changes to Local Repository
git add .
git commit -am "Fixed all the changes back to demo state"

# Push changes to Remote Repository
git push
References


